User Guide
HRConnect is a Command Line Interface (CLI) optimized desktop application designed for storing contacts of potential hires, hiring agencies, and legal consultants. By using commands, HR officers can efficiently organize contacts for their recruiting process.
- Table of Contents
Quick start
-
Ensure you have Java
11or above installed in your Computer. -
Download the latest
HRConnect.jarfrom here. -
Copy the file to the folder you want to use as the home folder for your HRConnect.
-
Open a command terminal,
cdinto the folder you put the jar file in, and use thejava -jar HRConnect.jarcommand to run the application. A GUI similar to the below should appear in a few seconds.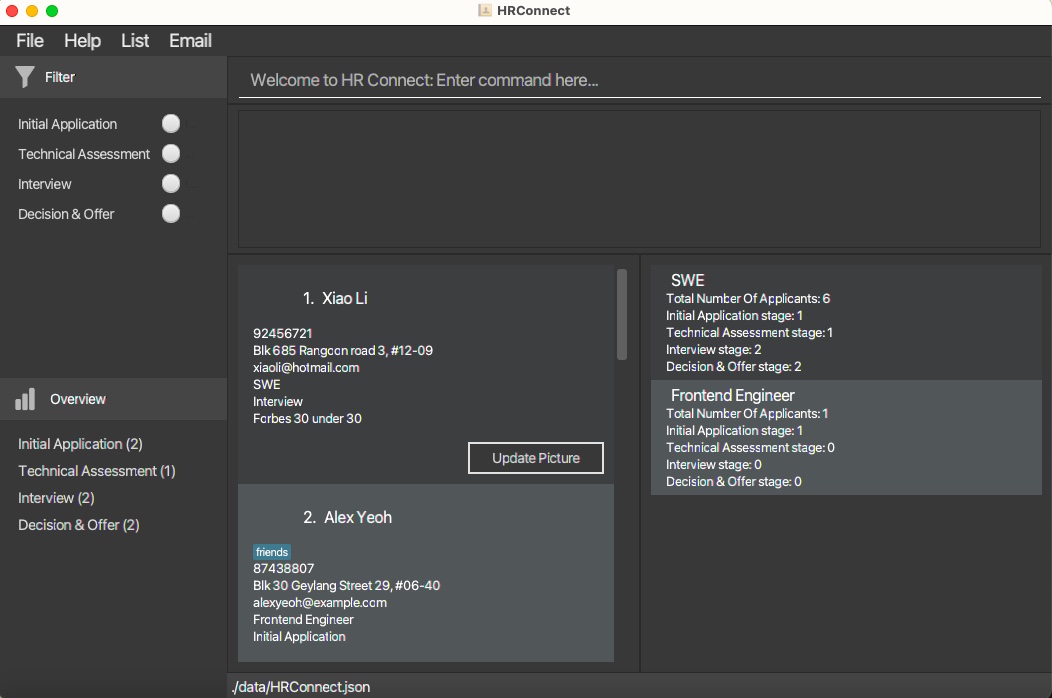
-
Under the side panel Filter, users can choose the stage to view only applicants who are in that stage, ensuring that only applicants in the selected stage are displayed in HRConnect. Users can opt to select 0, 1, 2, 3 or all 4 radio buttons. Multiple selections are allowed so that HR officers can efficiently view the applicants in the selected stages. Note that selecting 0 or 4 buttons will both give back the full list of applicants in all 4 stages. It is also important to note that using this Filter side panel will overwrite all commands. For instance, if you previously used the
findcommand tofind John, selecting theInterviewStage button will display the entire list of applicants inInterviewStage, not limited to those with John in their names. -
The Overview side panel gives users a quick overview on the count of number of applicants in each stage. The Person List showcases the applicants in HRConnect while the Role List showcases the roles of those applicants. Note how the app contains some sample data.
-
Type the command in the command box and press Enter to execute it. e.g. typing
helpand pressing Enter will open the help window.
Some example commands you can try:-
list: Lists all contacts. -
add /name John Doe /phone 98765432 /email johnd@example.com /address 311, Clementi Ave 2, #02-25 /role SWE /tag friends: Adds a contact namedJohn Doeto the HRConnect. -
delete 3: Deletes the 3rd contact shown in the current list. -
clear: Deletes all contacts. -
exit: Exits the app.
-
-
Refer to the Features below for details of each command.
Features
![]() Notes about the command format:
Notes about the command format:
-
When users input a command along with its arguments, it will be trimmed (remove leading whitespace, trailing whitespace, and whitespace in between words when there are more than one space).
-
When parsing arguments: “John Doe “, “John Doe”, and “ John Doe” will all be converted to “John Doe”.
-
When parsing commands: “/FILTER”, “/FILTER Interview ”, “ /FILTER Interview ” will all be converted to “/filter Interview”.
-
Words in angle brackets
<>are the parameters to be supplied by the user.
e.g. in/filter <Tag>,<Tag>is a parameter which can be used as/filter Interview. -
Items in square brackets are optional.
e.g/name NAME [/tag TAG]can be used as/name John Doe /tag friendor as/name John Doe. -
Parameters can be in any order for
addandeditcommands.
e.g. if the command specifies/name NAME /phone PHONE_NUMBER,/phone PHONE_NUMBER /name NAMEis also acceptable. -
Parameters must be in strict order for
filter,note,export, andtagcommand. -
Extraneous parameters for commands that do not take in parameters (such as
help,list,exitandclear) will be ignored.
e.g. if the command specifieshelp 123, it will be interpreted ashelp. -
If you are using a PDF version of this document, be careful when copying and pasting commands that span multiple lines as space characters surrounding line-breaks may be omitted when copied over to the application.
Viewing help : help
Shows a message explaining how to access the help page.
Format: help
Add an applicant: add
Adds an applicant to HRConnect.
Format: add /name Name /phone Phone_Number /email Email /address Address /role Role [/note Note] [/tag Tag]…
Examples:
add /name John Doe /phone 98765432 /email johndoe@gmail.com /address John street, block 123, #01-01 /role SWE /note Likes to swim
Listing all applicants : list
Shows a list of all applicants in the HRConnect.
Format: list
Editing an applicant : edit
Edits an existing applicant in the HRConnect.
Format: edit Index [/name Name] [/phone Phone] [/email Email] [/address Address] [/stage Stage]
[/note Note] [/role Role] [/tag Tag]…
- Edits the applicant at the specified
Index. The index refers to the index number shown in the displayed applicant list. The index must be a positive integer 1, 2, 3, … - At least one of the optional fields must be provided.
- Existing values will be updated to the input values.
- When editing stage, note that the names of Stages can only follow one of the following four options:
- Initial Application
- Technical Assessment
- Interview
- Decision & Offer
- When editing tags, the existing tags of the applicant will be removed i.e adding of tags is not cumulative.
- You can remove all the applicant’s tags by typing
/tagwithout specifying any tags after it.
Examples:
-
edit 1 /phone 91234567 /email johndoe@example.comEdits the phone number and email address of the 1st applicant to be91234567andjohndoe@example.comrespectively. -
edit 2 /name Betsy Crower /tagEdits the name of the 2nd applicant to beBetsy Crowerand clears all existing tags.
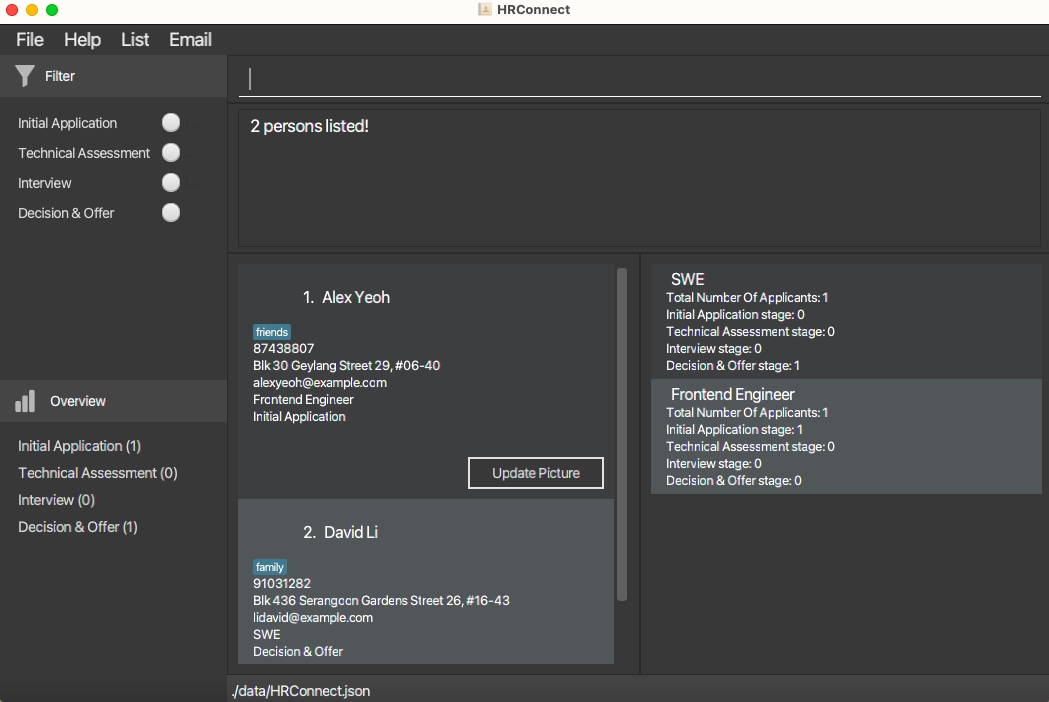
Locating applicants by name: find
Finds applicants whose names contain any of the given keywords.
Format: find Keyword [More_Keywords]
- The search is case-insensitive. e.g
hanswill matchHans - The order of the keywords does not matter. e.g.
Hans Bowill matchBo Hans - Only the name is searched.
- Only full words will be matched e.g.
Hanwill not matchHans - Applicants matching at least one keyword will be returned (i.e.
ORsearch). e.g.Hans Bowill returnHans Gruber,Bo Yang - To accommodate HR officers who deal with a large volume of applicants, executing
findtwo or more times without clicking on the buttons on the Filter side panel, or using thefiltercommand, or using thelistcommand, or clicking onShow Allon theListPanel will lead to anANDsearch between the keywords provided between the differentfindsearches. However, this will not affect theORsearch mentioned previously amongst the keywords provided in the same find command.
e.g. User first executesfind Johnand the HRConnect will return all applicants with John in the name. If the user then executesfind Doeafter the previous find command, HRConnect will only return those with both John and Doe in their names.
e.g. User first executesfind John Yuand the HRConnect will return all applicants with John or Yu in the name. If the user then executesfind Doedirectly after the previous find command, HRConnect will only return those with both John and Doe or those with both Yu and Doe in their names ieJohn Yuwill not get returned. - Clicking on the buttons of Stages on the side panel Filter before executing
Findcommand will return applicants that match the keyword and in the selected stages.
Examples:
-
find JohnreturnsjohnandJohn Doe -
find alex davidreturnsAlex Yeoh,David Li
Deleting an applicant : delete
Deletes the specified applicant from the HRConnect.
Format: delete Index
- Deletes the applicant at the specified
Index. - The index refers to the index number shown in the displayed applicant list.
- The index must be a positive integer 1, 2, 3, …
Examples:
-
listfollowed bydelete 2deletes the 2nd applicant in the HRConnect. -
find Betsyfollowed bydelete 1deletes the 1st applicant in the results of thefindcommand.
Filtering applicants by stage : filter
Filter through contact list based on what stage the applicant is in.
Format: filter /stage <ApplicantStage>
- Filters the contact list based on the
<ApplicantStage>provided. - Possible values for
<ApplicantStage>areInitial Application,Technical Assessment,Interview,Decision & Offer.
Examples:
-
filter /stage Interviewfilters the contact list to show only applicants in the Interview stage.
Adding notes to applicants by tag : /note
Facilitates the addition of notes or comments to individual applicant entries.
Format: note Index /note <Note>
- Adds a note to the applicant at the specified
Index. - Incorporate supplementary notes to enrich the applicant’s profile.
- Possible values for
Indexare positive integers. - Possible values for
<Note>are any non-empty string that provides relevant commentary.
Examples:
-
note 1 /note S/Pass Holderwill add the note “S/Pass Holder” to the applicant identified by Index 1.
Searching applicants by notes : search
Search through contact list based on what note the applicant contains.
Format: search /note <ApplicantNote>
- Searches the contact list based on the
<ApplicantNote>provided. - Possible values for
<ApplicantNote>can be any fully filled or partially filled note that exists within an Applicant in the current contact list. - If no note is provided after the prefix
search /note, the search result will return all applicants
Examples:
-
search /note Promising applicantsearches and fetches applicant with the notePromising applicant
Adding date to notes
- An optional
datecan be attached to the note when using the note command. - When used, it will attach today’s date to the note in
MMMM d, yyformat (e.g March 3, 24). - Format:
note Index /note <Note> /date Flag - The possible values for
Flagistrueandfalse(case-insensitive). - When
Flagis set totrue, adatewill be attached to the note when displayed.
Exporting applicants contacts : export
Use filter or find to isolate the applicants that match the desired stage or role or name. Export will then extract those applicants’ contacts into an external JSON file.
Format: export <FileName>
- Achieve an additional layer of organisation to properly arrange contacts
- Specifying a
<FileName>that already exists in the “data” folder will overwrite the existing one
Examples:
-
export saved_contactswill save contacts from the current page into an external JSON file named “saved_contacts.json” under the “data” folder.
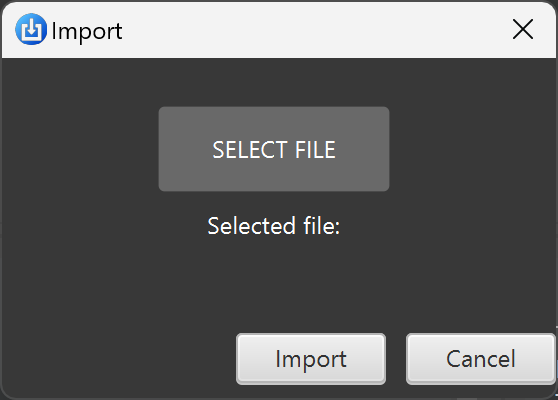
Importing applicants : import
Using import will open a dialog for user to select the json file to import.
The json file must be exported from HRConnect for it to be recognised.
Importing applicants (CLI way) : import_file Filepath
Using import_file with valid Filepath pointing to the json file will directly import applicants without the dialog.
The json file must be exported from HRConnect for it to be recognised.
Example: import_file C:\tp\data\interesting.json will import applicants from the interesting.json
in the specified directory.
Creating recurrent email templates : Email
Creates recurring email templates for the user to copy based on the application stage the user is targetting using the Email button on the Ui.
Clearing all entries : clear
Clears all entries from the HRConnect.
Format: clear
Exiting the program : exit
Exits the program.
Format: exit
Saving the data
HRConnect data are saved in the hard disk automatically after any command that changes the data. There is no need to save manually.
Editing the data file
HRConnect data are saved automatically as a JSON file [JAR file location]/data/HRConnect.json. Advanced users are welcome to update data directly by editing that data file.
Furthermore, certain edits can cause the HRConnect to behave in unexpected ways (e.g., if a value entered is outside of the acceptable range). Therefore, edit the data file only if you are confident that you can update it correctly.
Updating applicant profile picture (Part of Planned Enhancement)
Each applicant has a Update Picture button, which enables the user to add a profile picture for a particular applicant.
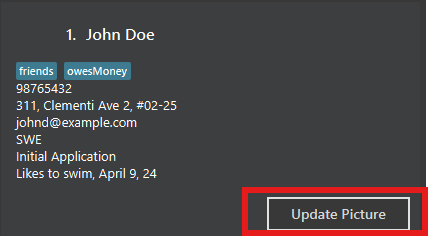
Note: Due to buggy implementation of this feature, a very specific set of steps needs to be performed in order for this feature to work.
- Before using this feature, use the
listcommand at least once. This allows the.jsonfile that stores the applicant information to be generated. - Press the
Update Picturebutton and select an image (only image file types are supported, using other file types may corrupt the application). - After choosing an image, a popup should appear that explains to you that the application needs to be restarted for the changes to be reflected.
- Restart the application, and you should be able to see the profile picture being updated.
- In rare occasions, the feature may not work due to operating system complications.
Command summary
| Action | Format, Examples |
|---|---|
| Add |
add /name Name /phone Phone_Number /email Email /address Address /role Role [/note Note] [/tag Tag]… e.g., add /name James Chow /phone 96622612 /email james@example.com /address 321, Clementi Ave 2, #02-25 /role Junior Engineer /note Likes to swim
|
| Clear | clear |
| Delete |
delete INDEXe.g., delete 3
|
| Edit |
edit Index [/name Name] [/phone Phone] [/email Email] [/address Address] [/stage Stage] [/role Role] [/note Note] [/tag Tag]…e.g., edit 2 /stage Interview
|
| Find |
find Keyword [More_Keywords]e.g., find alice bob charlie
|
| List | list |
| Help | help |
| Exit | exit |
| Filter |
filter /stage <ApplicantStage> e.g., filter /stage Initial Application
|
| Search |
search /note <ApplicantNote> e.g., search /note Promising applicant
|
| Note |
note <ApplicationId> /note <Note> e.g., note 1 /note S/Pass Holder
|
| Export |
export <FileName> e.g., export saved_contacts
|
| Import | import |
| Import (CLI) |
import_file Filepath e.g., import_file C:\tp\data\interesting.json
|